If you followed this you now have a server. It’s now time to start utilizing it. In this guide we will be setting up Nextcloud.
Nextcloud is a free (Open Source) Dropbox-like software. The project is written in PHP and JavaScript. It supports many database systems such as MySQL/MariaDB, PostgreSQL, Oracle Database and SQLite.
To allow Synchronization between server, desktop and mobile phone, Nextcloud provides applications for Windows, Linux and Mac desktop. As well as a mobile app for Android and iOS.
Nextcloud is not just a Dropbox clone. It provides additional features like Calendar, Contacts, Scheduled tasks and web forms.
In this tutorial, we will show you how to install and configure the latest Nextcloud release (at the time of writing it’s version 23) on a Debian 11 server. We will run Nextcloud with an Nginx web server and PHP7.4-FPM and use MariaDB server as the database system.
This tutorial has been tested using Debian 11.
Prerequisite
- Server running Debian 11 or derivatives
- Root privileges
The process
- Install Nginx webserver
- Install and Configure PHP7.4-FPM
- Install and Configure MariaDB
- Generate SSL Let’s Encrypt
- Download Nextcloud 23
- Configure Nginx Host for Nextcloud
- UFW Firewall Configuration
- Nextcloud Post-Installation
1. Install Nginx Web-server
Log in to the server and update the repository, then install the Nginx web server using the apt command as shown below.
sudo apt update && sudo apt upgrade -y
sudo apt install nginx -y
After the installation is complete, start the Nginx service and enable the service to launch every time at system boot using systemctl.
sudo systemctl start nginx
sudo systemctl enable nginx
The Nginx service is up and running, check it using the following command.
sudo systemctl status nginx
And you will get the result as below:
● nginx.service - A high performance web server and a reverse proxy server
     Loaded: loaded (/lib/systemd/system/nginx.service; enabled; vendor preset: enabled)
     Active: active (running) since Tue 1998-05-21 22:10:13 EST; 4 days ago
       Docs: man:nginx(8)
    Process: 27176 ExecStartPre=/usr/sbin/nginx -t -q -g daemon on; master_process on; (code=exited, status=0/SUCCESS)
    Process: 27177 ExecStart=/usr/sbin/nginx -g daemon on; master_process on; (code=exited, status=0/SUCCESS)
    Process: 1328730 ExecReload=/usr/sbin/nginx -g daemon on; master_process on; -s reload (code=exited, status=0/SUCCESS)
   Main PID: 27178 (nginx)
      Tasks: 5 (limit: 4144)
        CPU: 4min 57.436s
     CGroup: /system.slice/nginx.service
             ├─  27178 nginx: master process /usr/sbin/nginx -g daemon on; master_process on;
             ├─1328731 nginx: worker process
             ├─1328732 nginx: worker process
             ├─1328733 nginx: worker process
             └─1328734 nginx: worker process
2. Install and Configure PHP7.4-FPM
Install PHP and PHP-FPM packages neede by Nextcloud using the apt command below:
sudo apt install php7.4 php7.4-fpm php7.4-common php7.4-pgsql php7.4-cli php7.4-gd php7.4-json php7.4-curl php7.4-zip php7.4-xml php7.4-mbstring php7.4-bz2 php7.4-intl php7.4-bcmath php7.4-gmp php-imagick php7.4-opcache php7.4-readline
sudo apt install php-fpm php-curl php-cli php-mysql php-gd php-common php-xml php-json php-intl php-pear php-imagick php-dev php-common php-mbstring php-zip php-soap php-bz2 -y
After the installation is complete, we will configure the php.ini files for php-fpm and php-cli.
sudoedit /etc/php/7.4/fpm/php.ini
Change memory limit to 512M
Change max_execution_time to 256
sudoedit /etc/php/7.4/fpm/pool.d/www.conf
Uncomment those lines below:
env[HOSTNAME] = $HOSTNAME
env[PATH] = /usr/local/bin:/usr/bin:/bin
env[TMP] = /tmp
env[TMPDIR] = /tmp
env[TEMP] = /tmp
Restart the PHP7.4-FPM service and enable it to launch every time on system boot.
sudo systemctl restart php7.4-fpm
sudo systemctl enable php7.4-fpm
3. Install and Configure MariaDB
In this step, we will install the latest MariaDB version and create a new database for the Nextcloud installation. The latest version MariaDB packages are available on the repository by default.
sudo apt install mariadb-server -y
After the installation is complete, start the MariaDB service and enable it to launch every time at system boot.
sudo systemctl start mariadb
sudo systemctl enable mariadb
Next, we will configure the MariaDB root password using the ‘mysql_secure_installation’ command.
Run the following command:
sudo mysql_secure_installation
You will be asked for some configuration of MariaDB Server. Type the new root password for MariaDB Server.
Enter current password for root (enter for none): Press Enter
Set root password? [Y/n] Y
Remove anonymous users? [Y/n] Y
Disallow root login remotely? [Y/n] Y
Remove test database and access to it? [Y/n] Y
Reload privilege tables now? [Y/n] Y
Next, we will create a new database for nextcloud installation. We will create a new database named ‘nextcloud_db’ with the user ‘nextclouduser’ and password ‘Nextclouduser421@’.
Login to the MySQL shell as a root user with mysql command.
sudo mysql -u root -p
Now create the database and user with a password by running following MySQL queries.
Replace 'Nextclouduser421@' with your password.
create database nextcloud_db;
create user nextclouduser@localhost identified by 'Nextclouduser421@';
grant all privileges on nextcloud_db.* to nextclouduser@localhost identified by 'Nextclouduser421@';
flush privileges;
The new database and user for the nextcloud installation has been created.
4. Genenrate ssl Let’s Encrypt
We will secure Nextcloud using a free SSL Certificate from Let’s Encrypt. Install the Let’s Encrypt tool:
sudo apt install certbot -y
Next we will generate the SSL certificate for our domain name “cloud.example.com”:
If you followed this giude to set up a Cloudeflare tunnel you will need to add an additional service for this domain.
certbot --standalone -d cloud.example.com
You will be asked for the email address, and it’s used for the renew notification. For the Letsencrypt TOS agreement, type ‘A’ to agree and for the share email address, you can type ‘N’ for No.
The SSL certificates Letsencrypt for the Nextcloud domain name has been generated, all located at the ‘/etc/letsencrypt/live/your-domain’ directory.
5. Download Nextcloud
Go to /var/www directory and download the latest version of Nextcloud:
cd /var/www/
sudo wget https://download.nextcloud.com/server/releases/nextcloud-23.0.0.zip
Extract the Nextcloud source code and you will get a new directory ‘netxcloud’, change the ownership of the Nextcloud directory to user ‘www-data’.
sudo unzip nextcloud-23.0.0.zip
sudo chown -R www-data:www-data /var/www/nextcloud
As a result, the Nextcloud has been downloaded under the ‘/var/www/nextcloud’ directory, and it will be the web root directory.
6. Configure Nginx Virtual Host for Nextcloud
In this step, we will configure the nginx virtual host for nextcloud. We will configure nextcloud to run under the HTTPS connection and will force the HTTP connection automatically to the secure HTTPS connection.
Now go to the ‘/etc/nginx/sites-available’ directory and create a new virtual host file ‘nextcloud’:
cd /etc/nginx/sites-available/
sudoedit nextcloud
There, paste the following configuration.
upstream php-handler {
    #server 127.0.0.1:9000;
    server unix:/var/run/php/php7.4-fpm.sock;
}

server {
    listen 80;
    listen [::]:80;
    server_name cloud.example.com;

    # Enforce HTTPS
    return 301 https://$server_name$request_uri;
}

server {
    listen 443      ssl http2;
    listen [::]:443 ssl http2;
    server_name cloud.example.com;

    # Use Mozilla's guidelines for SSL/TLS settings
    # https://mozilla.github.io/server-side-tls/ssl-config-generator/
    ssl_certificate     /etc/ssl/nginx/cloud.example.com.crt;
    ssl_certificate_key /etc/ssl/nginx/cloud.example.com.key;

    # HSTS settings
    # WARNING: Only add the preload option once you read about
    # the consequences in https://hstspreload.org/. This option
    # will add the domain to a hardcoded list that is shipped
    # in all major browsers and getting removed from this list
    # could take several months.
    #add_header Strict-Transport-Security "max-age=15768000; includeSubDomains; preload;" always;

    # set max upload size and increase upload timeout:
    client_max_body_size 512M;
    client_body_timeout 300s;
    fastcgi_buffers 64 4K;

    # Enable gzip but do not remove ETag headers
    gzip on;
    gzip_vary on;
    gzip_comp_level 4;
    gzip_min_length 256;
    gzip_proxied expired no-cache no-store private no_last_modified no_etag auth;
    gzip_types application/atom+xml application/javascript application/json application/ld+json application/manifest+json application/rss+xml application/vnd.geo+json application/vnd.ms-fontobject application/wasm application/x-font-ttf application/x-web-app-manifest+json application/xhtml+xml application/xml font/opentype image/bmp image/svg+xml image/x-icon text/cache-manifest text/css text/plain text/vcard text/vnd.rim.location.xloc text/vtt text/x-component text/x-cross-domain-policy;

    # Pagespeed is not supported by Nextcloud, so if your server is built
    # with the `ngx_pagespeed` module, uncomment this line to disable it.
    #pagespeed off;

    # HTTP response headers borrowed from Nextcloud `.htaccess`
    add_header Referrer-Policy                      "no-referrer"   always;
    add_header X-Content-Type-Options               "nosniff"       always;
    add_header X-Download-Options                   "noopen"        always;
    add_header X-Frame-Options                      "SAMEORIGIN"    always;
    add_header X-Permitted-Cross-Domain-Policies    "none"          always;
    add_header X-Robots-Tag                         "none"          always;
    add_header X-XSS-Protection                     "1; mode=block" always;

    # Remove X-Powered-By, which is an information leak
    fastcgi_hide_header X-Powered-By;

    # Path to the root of your installation
    root /var/www/nextcloud;

    # Specify how to handle directories -- specifying `/index.php$request_uri`
    # here as the fallback means that Nginx always exhibits the desired behaviour
    # when a client requests a path that corresponds to a directory that exists
    # on the server. In particular, if that directory contains an index.php file,
    # that file is correctly served; if it doesn't, then the request is passed to
    # the front-end controller. This consistent behaviour means that we don't need
    # to specify custom rules for certain paths (e.g. images and other assets,
    # `/updater`, `/ocm-provider`, `/ocs-provider`), and thus
    # `try_files $uri $uri/ /index.php$request_uri`
    # always provides the desired behaviour.
    index index.php index.html /index.php$request_uri;

    # Rule borrowed from `.htaccess` to handle Microsoft DAV clients
    location = / {
        if ( $http_user_agent ~ ^DavClnt ) {
            return 302 /remote.php/webdav/$is_args$args;
        }
    }

    location = /robots.txt {
        allow all;
        log_not_found off;
        access_log off;
    }

    # Make a regex exception for `/.well-known` so that clients can still
    # access it despite the existence of the regex rule
    # `location ~ /(\.|autotest|...)` which would otherwise handle requests
    # for `/.well-known`.
    location ^~ /.well-known {
        # The rules in this block are an adaptation of the rules
        # in `.htaccess` that concern `/.well-known`.

        location = /.well-known/carddav { return 301 /remote.php/dav/; }
        location = /.well-known/caldav  { return 301 /remote.php/dav/; }

        location /.well-known/acme-challenge    { try_files $uri $uri/ =404; }
        location /.well-known/pki-validation    { try_files $uri $uri/ =404; }

        # Let Nextcloud's API for `/.well-known` URIs handle all other
        # requests by passing them to the front-end controller.
        return 301 /index.php$request_uri;
    }

    # Rules borrowed from `.htaccess` to hide certain paths from clients
    location ~ ^/(?:build|tests|config|lib|3rdparty|templates|data)(?:$|/)  { return 404; }
    location ~ ^/(?:\.|autotest|occ|issue|indie|db_|console)                { return 404; }

    # Ensure this block, which passes PHP files to the PHP process, is above the blocks
    # which handle static assets (as seen below). If this block is not declared first,
    # then Nginx will encounter an infinite rewriting loop when it prepends `/index.php`
    # to the URI, resulting in a HTTP 500 error response.
    location ~ \.php(?:$|/) {
        # Required for legacy support
        rewrite ^/(?!index|remote|public|cron|core\/ajax\/update|status|ocs\/v[12]|updater\/.+|oc[ms]-provider\/.+|.+\/richdocumentscode\/proxy) /index.php$request_uri;

        fastcgi_split_path_info ^(.+?\.php)(/.*)$;
        set $path_info $fastcgi_path_info;

        try_files $fastcgi_script_name =404;

        include fastcgi_params;
        fastcgi_param SCRIPT_FILENAME $document_root$fastcgi_script_name;
        fastcgi_param PATH_INFO $path_info;
        fastcgi_param HTTPS on;

        fastcgi_param modHeadersAvailable true;         # Avoid sending the security headers twice
        fastcgi_param front_controller_active true;     # Enable pretty urls
        fastcgi_pass php-handler;

        fastcgi_intercept_errors on;
        fastcgi_request_buffering off;
    }

    location ~ \.(?:css|js|svg|gif|png|jpg|ico|wasm|tflite)$ {
        try_files $uri /index.php$request_uri;
        expires 6M;         # Cache-Control policy borrowed from `.htaccess`
        access_log off;     # Optional: Don't log access to assets

        location ~ \.wasm$ {
            default_type application/wasm;
        }
    }

    location ~ \.woff2?$ {
        try_files $uri /index.php$request_uri;
        expires 7d;         # Cache-Control policy borrowed from `.htaccess`
        access_log off;     # Optional: Don't log access to assets
    }

    # Rule borrowed from `.htaccess`
    location /remote {
        return 301 /remote.php$request_uri;
    }

    location / {
        try_files $uri $uri/ /index.php$request_uri;
    }
}
Save and exit.
Enable the virtual host and make sure there is no errors:
sudo ln -s /etc/nginx/sites-available/nextcloud /etc/nginx/sites-enabled/
sudo nginx -t
Now restart Nginx service using the command:
sudo systemctl restart nginx
7. Configure UFW Firewall
In this tutorial, we will turn on the firewall, and we will be using the UFW firewall for Ubuntu.
Add the SSH, HTTP and HTTPS to the UFW firewall list using the command below.
sudo ufw allow ssh
sudo ufw allow http
sudo ufw allow https
Now Enable the firewall and check the allowed service and port:
sudo ufw enable
sudo status numbered
And you will see HTTP port 80 and HTTPS port 443 is on the list.
8. Nextcloud Post-installation
Open a Browser on your local network and go to the nextclud URL: https://cloud.example.com
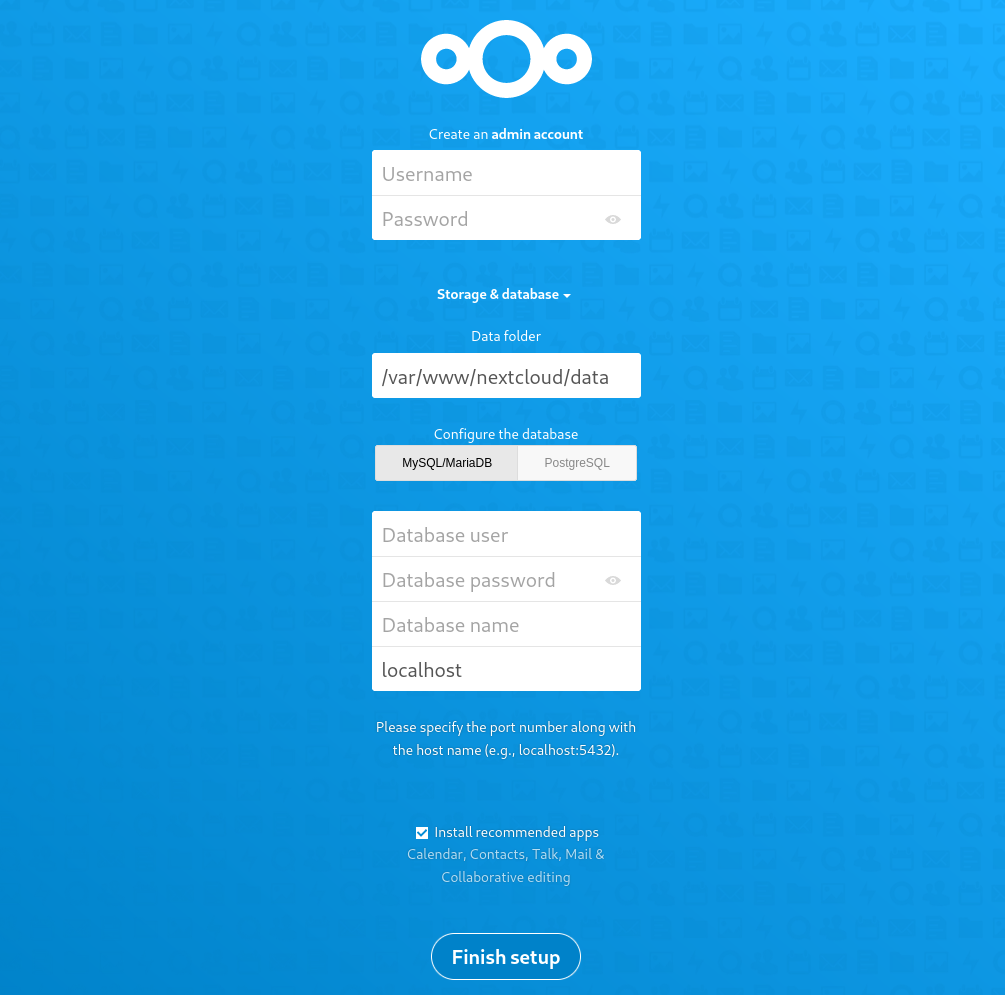
On the top of the page we need to create an admin user for Nextcloud. Type in a
user name and password. On the ‘data folder’ type the full of the ‘data’
directory. /var/www/nextcloud/data
On the bottom of the page you will need to enter the database info from step 3. Then click the ‘Finish Setup’ button.
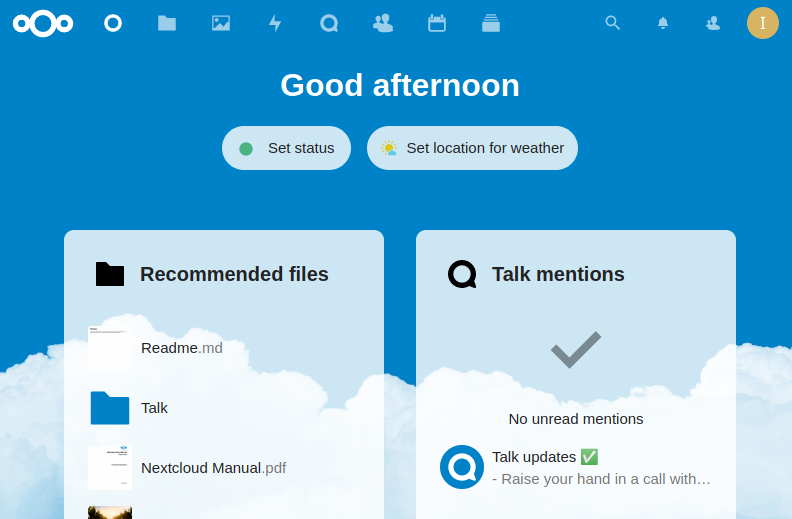
After the installation is complete, you will get the Nextcloud dashboard.